My Oyster Shell Decor Ideas (Yes, I’m Obsessed)
I’ve spent probably $11 total on oyster shell decor in my house, and guests consistently ask me which boutique I bought it from. That’s not a brag — that’s the whole point. Further down I’ll show you how I built a shell mirror frame that looks like a $200 boutique find, how I finally fixed my sad bathroom counter situation, and why your next dinner party centerpiece might literally come from your next dinner. Stay with me.

Build an Oyster Shell Chandelier (Your Ceiling Deserves This)
Overhead lighting is a crime. I’ve said it a hundred times. The one exception I’ll make is a chandelier that earns its place — and an oyster shell chandelier genuinely earns it.
Here’s the thing about shells: the pearl interior catches light the way no manufactured material does. When candlelight or even a warm Edison bulb hits those ridged, iridescent curves, the whole room shifts. You get these soft, shifting shadows on the walls. It’s legitimately stunning and it cost me maybe $30 to make.
Here’s how I built mine, start to finish:
- Collect shells in a range of sizes. I saved mine from a summer’s worth of oyster happy hours, but you can buy bulk bags of cleaned oyster shells on Etsy for around $15–$20 for 50 shells.
- Soak each shell in a diluted bleach solution (about 1 tablespoon bleach per gallon of water) for 30 minutes. Rinse well, let dry fully in the sun for at least a day.
- Use a small diamond-tip drill bit (around $8 at any hardware store) to drill a hole near the hinge end of each shell. Go slow. I cracked four shells the first time because I rushed. Use a piece of tape over the drill spot — it helps reduce cracking.
- Cut fishing line or thin jewelry wire in strands ranging from 12 to 24 inches. Varying the length is what gives it that cascading, layered look.
- Attach the strands to a wire wreath frame or an old wagon wheel. I used a $4 wire form from the craft store.
- For light: I wrapped warm white string lights around the frame itself. You don’t need an electrician for this version — just plug it in. If you want a hardwired permanent fixture, that’s a separate project and yes, hire someone.
Hang it over a dining table, in a foyer, or — my actual dream — over a freestanding tub. The size I made fits a 36-inch round table comfortably. I used about 60 shells total. Took one weekend afternoon plus drying time. Worth every single minute.
An Oyster Shell Gallery Wall That Actually Looks Like Art


I had this blank wall in my hallway for two years. Two years. I kept telling myself I’d find the right print, the right framed photo, something. Then one afternoon I laid out a bunch of shells I’d collected on my living room floor and just… started playing.
The thing that surprised me is how much variety there is in oyster shells once you really look. Different sizes, different coloration, some more ridged and rough on the outside while others are smoother. Some have this deep grey-green exterior. Others are almost chalky white. That variation is what makes a gallery wall work.
A few approaches that look genuinely good:
- Shadow box compositions. A 5×7 or 8×10 shadow box from the craft store (usually $6–$12) lets you create a three-dimensional arrangement. I filled one with a large shell, a piece of sea glass, and a tiny bit of dried coral I found at the thrift store. It looks like a little museum specimen.
- Single framed shells. Find your most spectacular shell, put it in a simple white float frame, hang it. Minimalist. Modern. Honestly chic in a way the busier arrangements aren’t.
- Color-washed groupings. If you want a more art-forward look, try a very light wash of diluted acrylic in seafoam green or pale blue over a cluster of shells before framing. Just a hint of color — you still want to see the natural texture underneath.
I mixed in one old coastal photograph (black and white, picked it up at an antique mall for $3 in a beat-up frame) and a small piece of driftwood I wired flat to the wall. The whole arrangement cost me under $25 and covers a wall section about 4 feet wide. People ask about it constantly.
One honest caveat: this takes some rearranging before you commit. I laid everything out on the floor first and took a photo on my phone to preview the layout before putting a single nail in the wall. Do that. Save yourself the spackle.
Oyster Shell Planters Your Succulents Will Love


Biscuit knocked over my third succulent pot last spring and I finally stopped replacing them with regular pots. I went shell. Haven’t looked back.
Large, deep oyster shells are genuinely perfect succulent vessels. They’re shallow, which succulents prefer, and the drainage situation is actually pretty natural — most shells have enough imperfection in their surface that water doesn’t pool. I do add a small layer of pebbles (maybe half an inch) before any soil just to be safe.
The combination that looks most striking to me: dark green or purple echeveria against the silver-grey of an oyster shell exterior. The contrast is just really, really good. I group three shells of graduated sizes on a small piece of driftwood I found at the beach and it lives on my coffee table. It gets compliments every time someone comes over.
For air plants (tillandsia), oyster shells are honestly ideal. No soil needed. The plant just sits in the curve of the shell like it was made for it. Mist once or twice a week, let them dry fully, and they’re happy. I have four of these in my bathroom window and they’ve been alive for over a year, which is honestly more than I can say for some of my other plant experiments.
Tips I learned the slightly annoying way:
- Select shells that sit flat without rocking. Test them on a flat surface before you plant anything. An uneven shell that tips over once is annoying. Once it tips into your carpet, it’s a whole thing.
- Don’t put shells with planted soil in direct harsh sunlight on a wood surface — the moisture from watering can leave rings. Use a small tray or a piece of felt underneath.
- Shells will develop a bit of natural patina over time where the soil sits. I think it looks better, personally. More lived-in. But if you want to keep them pristine, use removable liners.
Shell Candle Holders That Make Every Night Feel Like a Dinner Party


I discovered this one by accident. I was out of regular candle holders for a dinner I was hosting and grabbed a few large shells off my windowsill in desperation. My friend Sarah spent ten minutes trying to figure out where I’d bought them before I admitted what they were. Accidental success.
The pearl interior of oyster shells does something magic with candlelight. It’s not just reflecting it — it seems to amplify and warm it. The glow you get is softer and more amber than what you’d get from a glass votive. It genuinely looks expensive.
For making actual shell candles (not just holders):
- Use soy wax — it has a lower melting point and is easier to work with than paraffin. A small bag runs about $8–$10 and makes several candles.
- Melt the wax, add a few drops of fragrance oil if you want (I love sea salt and driftwood scent for obvious reasons), then let it cool until it’s about the consistency of pudding before pouring. If you pour it too hot into the shell, it can run over the edges.
- Place your wick using a wick holder or just a chopstick laid across the top of the shell to keep it centered. Let it set completely — at least 4 hours — before trimming the wick to about a quarter inch.
- Test the first one before you make a dozen. I had one shell with a hairline crack that didn’t hold wax well. You find these things out.
For the fastest version: a standard tea light drops right into a medium shell and looks beautiful. Zero crafting required. I keep a basket of shells with tea lights in them on my mantel at all times during fall and winter. Line them up, light them all, dim the overheads (obviously), and the room is transformed in about 45 seconds.
For outdoor use — patios, garden pathways, outdoor dining — shell candle holders are actually better than most dedicated outdoor options. The shell itself doesn’t blow over easily and the weight keeps the candle stable in a light breeze.
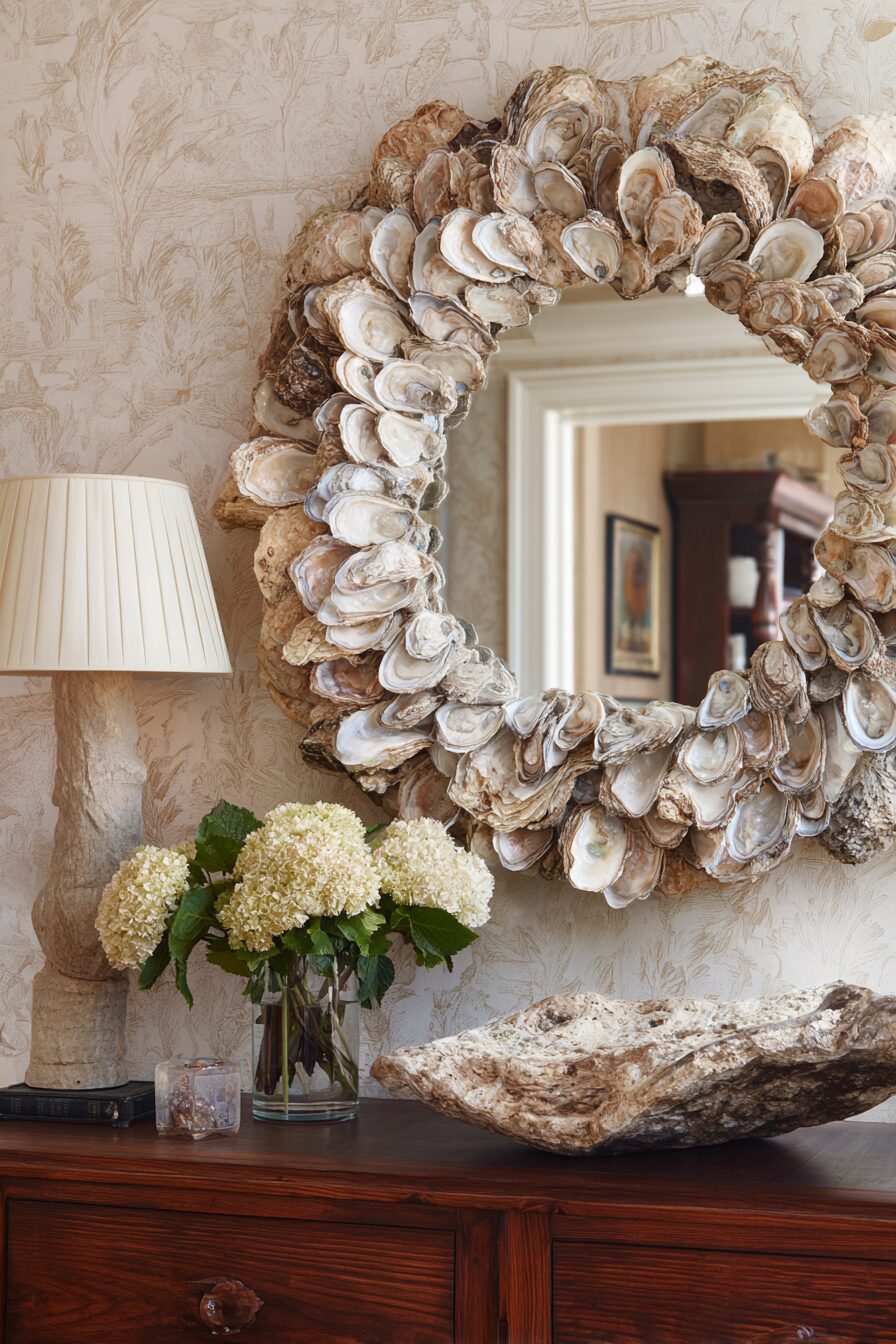
The Oyster Shell Mirror Frame Project (My Most-Asked-About DIY)


This is the one. If you do one project from this whole list, make it this one.
I bought a plain round mirror from IKEA for $19. I spent an afternoon attaching shells around the frame with E6000 glue. The result looks so much like something from a coastal home boutique that I’ve had people ask me twice where I got it. It’s in my entryway and it’s genuinely one of my favorite things in my house.
Here’s the actual process, including the mistakes I made so you don’t have to:
- Lay the mirror flat on a work surface covered with newspaper. Do not try to do this vertically. Gravity will destroy you.
- Spend time arranging shells before you glue anything. Mix the orientations — some shells facing outward showing the ridged exterior, some facing inward to show that pearly surface. Some pointing up, some sideways. Organic and slightly chaotic looks intentional. Too uniform looks craft-project-y.
- Use E6000 adhesive. I tried hot glue the first time (on a test piece) and the shells slid before it set. E6000 is slower but it holds permanently. Apply a dime-sized amount to the base of each shell, press firmly, and let it tack for a few minutes before releasing.
- Layer shells over each other slightly — this is what creates the dimensional, reef-like quality that makes the finished piece look professional. Don’t place them all in one flat row.
- Let it cure for a full 24 hours before hanging. Seriously. I hung mine after 6 hours once and a few shells shifted. Learned that one the annoying way.
The same technique works on picture frames. I did a matching set of three small frames (all from the thrift store, $1–$2 each) with shells in a lighter, sparser pattern. They hang in a cluster near the mirror and the whole little vignette looks really cohesive.
Total cost for the mirror project: about $25 including the mirror, glue, and extra shells I bought to supplement what I had.
Oyster Shell Serving Pieces That Make Dinner Parties Actually Memorable

I served burrata and tomatoes on oyster shells at my last dinner party and three people texted me afterward asking about it. It’s such a simple thing and it makes such an impression.
Large, flat oyster shells are genuinely functional individual serving plates, especially for appetizers. They’re naturally food-safe once properly cleaned, visually striking on a table, and they tie your coastal decor right into your hospitality in this really lovely way.
Cleaning for food use is non-negotiable and needs to be thorough:
- Scrub the interior with a stiff brush and dish soap first to get any residue off.
- Soak in a solution of 1 tablespoon unscented bleach per gallon of water for 15 minutes.
- Rinse extremely thoroughly — multiple rinses — and air dry completely before use.
- I run mine through the top rack of my dishwasher (no heated dry) as a final step and they come out beautifully.
For hot appetizers — stuffed mushrooms, baked brie bites, shrimp — you can put oyster shells directly on a baking sheet and heat them in a 350°F oven. They’re naturally heat-resistant and will keep your food warm at the table longer than a plate would.
Outside of actual food service, large shells are some of the best soap dishes I’ve ever used. The natural curve keeps the soap elevated off the surface so it drains properly and lasts longer. I have one in my guest bathroom and it looks a thousand times better than the little plastic soap tray that was there before. Same goes for jewelry dishes on a nightstand, catch-all trays by the front door, or a small change holder.
Turn Your Bathroom Into a Spa With Oyster Shell Accessories

My bathroom used to be the one room in my house I’d sort of given up on. Rental-beige walls, overhead fluorescent light, zero personality. Adding shell accessories was the thing that finally made it feel intentional.
Here’s how I styled mine and approximately what it cost:
- Soap dish: One large flat shell. Free (saved from dinner). Looks better than any soap dish I’ve ever bought.
- Cotton ball and Q-tip holders: Two medium shells, sitting on a small reclaimed wood board from the craft store ($4). Total cost: $4.
- Bath salt display: One extra-large shell holding pink Himalayan salt I bought in bulk. The pearl interior makes the pink of the salt look really beautiful — the contrast is unexpected and lovely.
- Toothbrush situation: I arranged four medium shells in a small weathered wood box (thrift store, $2), each shell holding one toothbrush. It sounds fussier than it is. Takes two seconds to set up and it looks like something from a boutique hotel bathroom.
The pearl interior of shells in bathroom lighting is genuinely special. If your bathroom has natural window light in the morning, the shells will pick it up and bounce it around in this warm, soft way that makes a real difference in how the space feels. Even under less-than-ideal overhead lighting (sigh), the shells add texture and dimension that breaks up an otherwise flat counter.
I’d pair all of this with one or two air plants (as mentioned in the planter section), a small piece of driftwood, and maybe a smooth river stone or two. The whole bathroom accessory setup costs under $20 and the effect is out of proportion to the investment. Honestly.
Make Oyster Shell Wind Chimes That Sound Like Summer

Metal wind chimes make me slightly anxious. Too loud, too clangy — I always feel like they’re announcing something urgent. Oyster shell wind chimes are completely different. The sound is soft, organic, almost like distant waves. I have one hanging from the covered part of my back porch and it’s genuinely one of my favorite sounds.
What you need and approximately what it’ll run you:
- 10–20 shells in varying sizes ($0 if collected, or ~$10 for a bag online)
- Small diamond-tip drill bit (~$8) — same one from the chandelier project
- 50-lb test monofilament fishing line (~$5 for a spool that’ll last you forever)
- One piece of driftwood, 12–18 inches long, as your top bar — ideally something with a little curve or character to it
- Screw eyes or small cup hooks to attach strands to the driftwood ($2)
Drill holes near the hinge end of each shell. Go slow, use low speed, and put a piece of painter’s tape over the spot before drilling — it prevents the bit from skating across the surface and reduces cracking significantly. I still crack about one in every seven or eight shells. Just budget for that.
Cut strands in lengths ranging from about 6 inches to 16 inches. String one to three shells per strand at different intervals so they’ll bump into each other at different points in the wind. Attach everything to your driftwood bar and hang from a single cord looped through both ends.
Position it where it’ll catch a light breeze but won’t get absolutely hammered in a storm. A covered porch is ideal. I’ve also seen them look beautiful hung from a low tree branch over a garden path.
Oyster Shell Table Centerpieces You’ll Use Year-Round

The thing I love about a shell-based centerpiece is that it’s modular. The shells stay. Everything around them changes with the season. That’s genuinely good decorating logic and I’m surprised more people don’t talk about it.
My current dining table setup: a long weathered wood tray (thrift store, $6) as the base. Inside it: a grouping of large oyster shells in graduated sizes, two short pillar candles in simple glass hurricane holders, and a small cluster of air plants. That’s it. It works for a random Tuesday dinner with my partner and it works when I have six people over.
For seasonal swaps:
- Fall: Add small gourds, dried cotton stems, or a few acorns between the shells. The contrast between the organic coastal shells and the warm autumn elements is actually really interesting — not expected, but it works.
- Winter/holidays: Tuck in some small pinecones, a few sprigs of preserved eucalyptus, white tapered candles. The shells read as almost snow-white in winter light.
- Spring/summer: Fresh flowers in a tiny vase, a bit of sea glass scattered around the shells, maybe a new air plant or two.
The height question trips people up. You want some variation — not everything flat, not everything tall. I use one taller candle, keep the shells at medium height, and let the air plants be low and sprawling. Diagonal movement, basically. Your eyes travel across it rather than landing in one spot.
Scale matters too. On a 36-inch round table, my tray is about 20 inches long. On a longer farmhouse-style table, I’d run two trays end to end or use a longer piece of driftwood as the base instead.
Oyster Shell Cabinet Pulls (The Upgrade Nobody Expects)


I did this in my bathroom and it cost me $0 beyond a pack of machine screws I already had. The shell pulls on my small vanity cabinet are, without exaggeration, the detail people notice most in that bathroom. More than the shells on the counter. More than the driftwood mirror. The hardware, because nobody expects hardware to be interesting.
This project requires a bit of patience and the right approach to drilling:
- Select shells that are relatively similar in depth and size — you want the pulls to feel consistent even if each one is unique. I aimed for shells about 2.5 to 3 inches wide.
- Use your diamond-tip bit to drill two holes through each shell, roughly the same spacing as standard cabinet hardware (most standard pulls are 3 inches center-to-center, so measure your cabinet doors first).
- Use a standard machine screw with a small washer behind the shell to distribute pressure and prevent cracking when tightened. Don’t overtighten. Snug is enough.
- Attach from the front of the cabinet door the same way you would any pull.
For single-hole knobs instead of pulls, drill one centered hole and use a slightly larger washer. The natural cup shape of the shell actually makes an ergonomically comfortable grip — more so than a lot of the decorative knobs I’ve used over the years.
The iridescent interior facing outward catches light every time you open a cabinet. It’s a tiny thing that you notice every single day. That kind of low-cost, high-impact detail is genuinely what good decorating is — not the expensive stuff, but the thoughtful stuff.
And for renters: this is fully reversible. Keep your original hardware in a labeled zip-lock bag, swap the shell pulls back before move-out, and your security deposit is safe. I’ve done this in two rental apartments now. Zero issues either time.
The truth about oyster shell decor is that it’s not really about coastal style, though it absolutely works for that. It’s about using materials that have real texture, real history (every shell was a living thing once), and real visual interest that no manufactured product can quite replicate. Start with one project — the mirror frame if you want maximum impact, the candle holders if you want minimum effort — and I promise you’ll start looking at your seafood dinner very differently from now on.