I ignored that wall behind my toilet for three full years. Three years of a blank, scuffed-paint void staring back at me every morning while I washed my face. Then I spent maybe $40 at a thrift store and a Sunday afternoon fixing it, and now it’s genuinely one of my favorite spots in my house. I’ll show you exactly how I did it, plus eleven more ideas that actually work in real bathrooms, not just on Pinterest.
Further down I’ll walk you through the floating shelf setup that changed everything for me, the gallery wall I almost didn’t try, a mirror trick that makes a small bathroom feel twice as big, and the lazy peel-and-stick wallpaper project that took one hour and gets more compliments than anything else in my house. Stick around, because the mix-and-match approach at the end is what I actually use, and it ties everything together.
Floating Shelves Changed Everything for Me

I installed two slim floating shelves behind my toilet last spring, and I’m still obsessed with them. They’re like a little stage for everything that used to clutter my counter.
Here’s exactly what I did, in case you want to copy it. I bought two LACK-style shelves from IKEA, each 23 inches wide and only 5 inches deep. That depth is important. Anything deeper starts to bump into your head when you stand up, and I learned that the hard way with my first attempt (those shelves got immediately returned). I mounted them about 8 inches apart, with the bottom shelf starting roughly 12 inches above the toilet tank.
Bottom shelf: rolled white hand towels, the fluffy kind that make you feel like a spa exists in your home. Top shelf: a small potted succulent in a white ceramic pot, a vanilla candle, and a tiny vintage perfume bottle I found for $4 at an estate sale.
Three to five items per shelf. That’s it. I once tried to fit seven things on the top shelf and it looked absolutely chaotic, like a flea market had exploded. Less is so much more here.
White or light wood keeps the whole thing feeling airy. Dark, heavy shelves in a small bathroom can feel like the walls are closing in. Go light, keep the styling minimal, and that narrow wall suddenly looks intentional.
The Gallery Wall Moment I Didn’t See Coming

Putting art behind a toilet felt weird to me. Then I did it anyway, and now it’s one of my favorite spots in my entire house.
My setup: four small frames arranged in a loose 2×2 grid. Two frames are matte black, two are thin gold. The prints are botanical sketches, a short quote about slowing down, and two small abstract watercolors I printed at home for basically nothing. Total cost was around $28 for the frames, all sourced from HomeGoods.
The mix of frame metals is what makes it feel collected instead of matchy-matchy. If all four frames were identical, it’d look like a set you bought at Target and just hung up. The slight variation makes it feel like you gathered things over time, even if you bought them all in one afternoon.
A few things I wish I’d known before I started. First: hang at eye level for someone standing at the sink, not eye level while sitting. My first attempt went about six inches too high and the frames basically disappeared into the ceiling. Second: stay with 5×7 and 8×10 frames. Oversized art in this narrow space feels suffocating. Third: if you’re nervous about making holes, use 3M Command picture strips first. Arrange everything, live with it for a few days, then commit to the nails once you’re sure.
Botanical prints, abstract shapes, simple typography, black and white photography. All work great. Busy, colorful scenes with lots going on? Skip those. You want the art to add warmth, not compete with the rest of the room.
Ladder Shelf Vibes Are Everything

Yes, this idea is all over Pinterest. But it actually works in real life, which not every Pinterest idea can claim.
I found a narrow bamboo ladder shelf at HomeGoods for $49. It has four rungs with small platforms, and it fits perfectly in the slim space without sticking out into the bathroom floor. Here’s how I styled it, rung by rung:
- Bottom rung: a woven seagrass basket with extra toilet paper rolls stacked neatly inside.
- Second rung: rolled white hand towels (yes, I have a towel rolling situation, I accept this about myself).
- Third rung: a small trailing pothos in a terracotta pot, plus a scented candle.
- Top rung: a tiny framed 4×6 photo and a second small plant.
The whole thing is maybe 14 inches wide and goes almost to the ceiling, so it draws your eye up and makes a low-ceilinged bathroom feel taller. That’s a genuinely useful trick.
What I love most is how easy it is to refresh. Swap in a new candle scent, move a plant up a shelf, switch out the towel color. Fifteen minutes and the bathroom feels different. No tools, no commitment.
One practical note: make sure the ladder sits stable. Mine had a tendency to lean and wobble slightly until I put adhesive rubber feet on all four contact points. About $3 at the hardware store and now it doesn’t move at all.
Plants Made My Bathroom Feel Like a Sanctuary

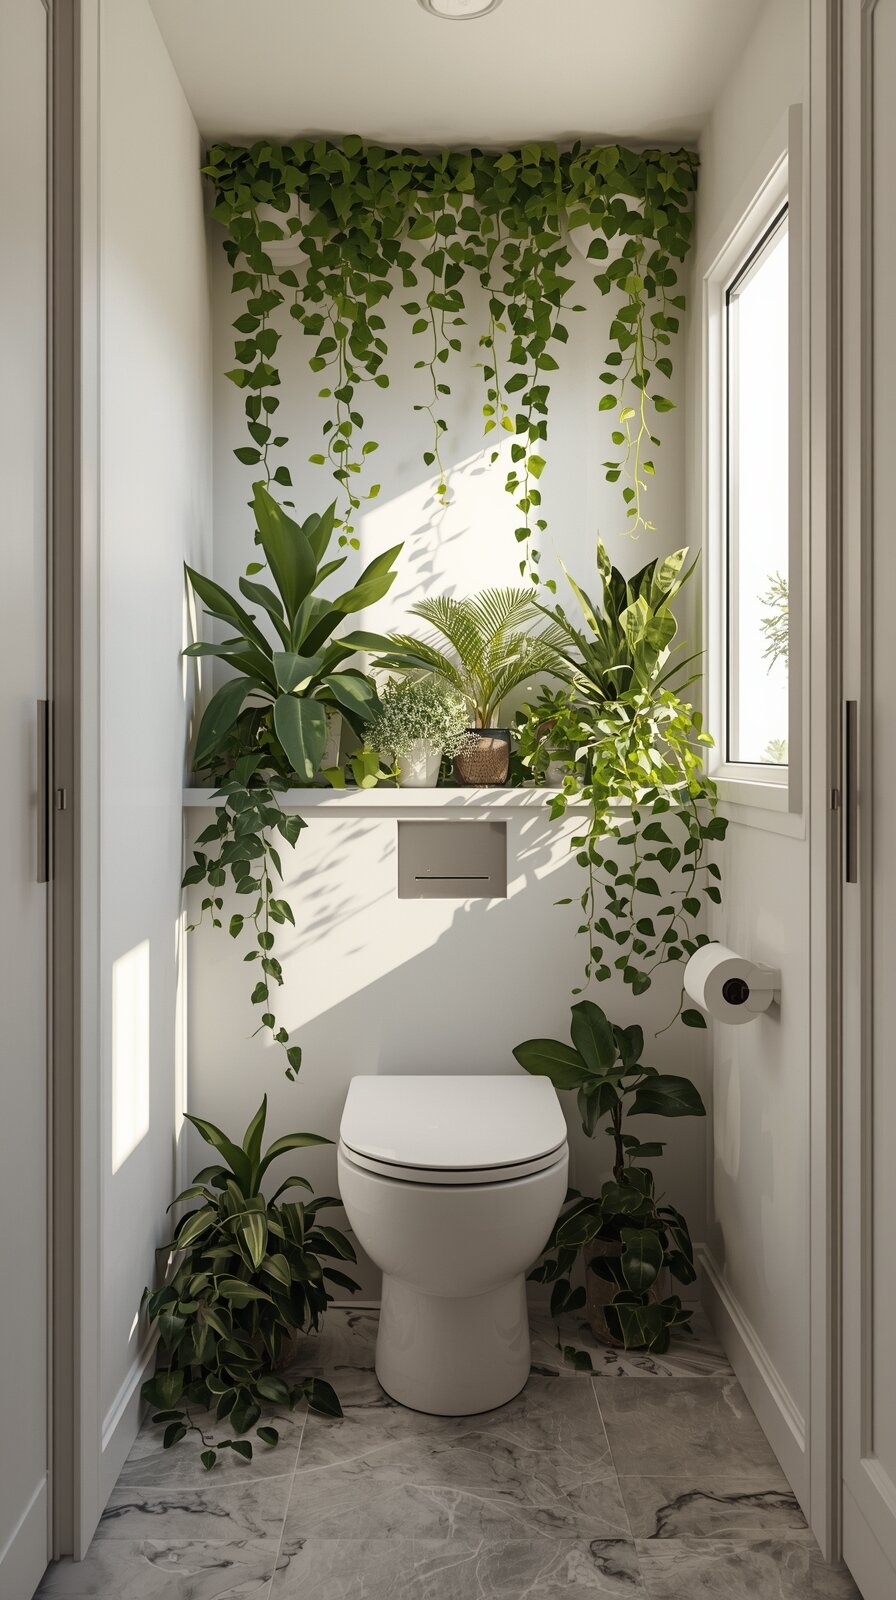
Greenery in a bathroom just hits different. I can’t fully explain it. Something about a living plant in a space that’s all hard tile and cold porcelain makes the whole room breathe.
My main plant back here is a pothos on a black metal plant stand, the kind with a circular top and hairpin legs. The vines have started trailing down the side of the tank, and it’s genuinely beautiful. Pothos is the right choice for most bathrooms because it tolerates low light, loves the humidity, and basically refuses to die no matter what you do to it. My bathroom has one small frosted window, and this plant is thriving.
Quick plant guide for behind the toilet, based on what’s worked in my house:
- Low light, high humidity: Pothos, ZZ plant, peace lily.
- Medium light: Snake plant, aloe, spider plant.
- Good light (lucky you): Small fiddle leaf, trailing string of pearls in a hanging pot above.
- Fake plants: Genuinely fine. The artificial pothos and eucalyptus bundles at IKEA are convincing enough that guests won’t know. Zero judgment from me.
One thing I messed up early on: no drainage tray. My first pothos pot dripped onto my white bath mat and left a rust ring I couldn’t get out. Get the saucer. It costs $2 and saves your floors.
I also have a small succulent on my floating shelf right above the plant stand. The height difference between the floor plant and the shelf plant creates dimension. The space goes from flat to layered just by adding that second level of greenery.
The Mirror Trick That Doubled My Space (Visually)

A tall, narrow mirror behind the toilet is one of those things that sounds odd until you see it. Then you wonder why you didn’t do it sooner.
I found an arched mirror with a thin brushed gold frame at HomeGoods for about $65. It’s 24 inches wide and 36 inches tall. That proportion matters. I’ll give you a quick breakdown of what works and what doesn’t:
Too small (under 18″ wide): looks like a random afterthought, adds nothing.
Just right (20–28″ wide, 30–40″ tall): feels intentional, bounces light, creates depth.
Too big (over 30″ wide): overwhelms the toilet visually, fights with your main vanity mirror.
The arched top softens the hard angles of a bathroom and feels a bit luxe without being over the top. Rectangular mirrors work too, especially in a more minimal or modern bathroom. Round mirrors are lovely but lose some of that light-bouncing height. Go arch or rectangle if you can.
An alternative I’ve seen done beautifully: three small round mirrors hung in a vertical line, each about 10 inches in diameter, staggered slightly. It looks chic and unexpected, and the multiple reflections really do make the space feel bigger.
Practical stuff: use proper drywall anchors if you’re not hitting a stud. Bathrooms have humidity that will slowly work on anything that’s not secured well, and a mirror falling off a wall is a disaster I don’t want for anyone. And wipe the mirror down weekly, because bathroom mist is real and a foggy mirror defeats the whole point.
Built-In Niche Styling (If You’re Renovating)

This one is for the people who are already tearing things apart. If you’re renovating a bathroom anyway, a built-in niche behind the toilet is worth every single conversation with your contractor.
Mine runs about 10 inches deep and nearly the full height of the wall behind the toilet. The back is tiled in a 3×6 sage green subway tile. Everything else in the bathroom is white. It’s the one moment of color and it looks like a little jewel box tucked into the wall.
What I keep inside: a glass bottle with bath salts, a jar candle, a small trailing pothos, and a couple of smooth river stones I picked up on a camping trip. Nothing expensive. It’s the framing that makes ordinary objects look special.
The best thing about a recessed niche is that nothing protrudes into the room. No shelves sticking out, no risk of bumping things, no visual clutter. The whole bathroom looks cleaner because there’s no stuff sitting on surfaces.
If you want to add some drama, LED strip lighting inside the niche is the move. I haven’t done mine yet but it’s at the top of my next-project list. The warm glow at night would be incredible.
Not renovating and not renting? There are wall-mounted shallow shadow box shelves that give a similar recessed look. They mount flush to the wall, sit about 3 to 4 inches deep, and styled right, they read as built-in. It’s not the real thing but it’s close enough to fool most people.
Over-the-Toilet Storage That Doesn’t Look Cheap

I was skeptical of these for a long time. The ones I kept seeing were all wobbly white wire shelving that screamed “college dorm, 2008.” Then I found a bamboo version with clean open shelving and honestly, I had to apologize to the concept.
The difference between a unit that looks cheap and one that looks intentional comes down to two things: material and proportion. Here’s the quick comparison:
- White wire or plastic: avoid. It reads as storage, not decor.
- Bamboo or light wood with clean lines: warm, natural, works in almost any bathroom style.
- Matte black metal: sleek and modern, especially good in a gray or white bathroom.
- Dark espresso wood: heavy-looking, makes a small bathroom feel closed-in. I’d skip it.
Mine is bamboo with three open shelves. Bottom shelf: a large woven basket that holds extra toilet paper and a backup bottle of hand soap. Middle shelf: a smaller basket with hair ties, bobby pins, and the other small things that always end up on my counter. Top shelf: plant, candle, a pretty ceramic soap dish that I moved up there because I liked looking at it.
Before you buy, measure twice. Some of these units are deeper than the product photos suggest, and if yours sticks out past the tank, it looks off. Also confirm the width fits over your specific toilet model. Most standard units clear a standard toilet fine, but it’s worth double-checking if you have a round bowl instead of elongated.
Price range for a decent one is roughly $45 to $90. I’d say $60 is the sweet spot where quality gets noticeably better.
Wallpaper Just on That Back Wall (Yes, Really)

This is the project that gets the most compliments and it took me exactly one hour and about $35 in peel-and-stick wallpaper.
I did my powder room first, as a test. The rest of the bathroom is painted a soft warm cream, and that one wall behind the toilet is covered in this blush pink and gold leaf pattern. It’s bold. It’s unexpected. Everyone who walks in says something about it.
Peel-and-stick is the move for this, especially if you’re renting or just not sure you’ll love it. I got mine from a shop on Etsy for $34 for two rolls, which was more than enough for that single wall. Application process was genuinely easy: wipe the wall clean and dry, start at the top and work down, smooth out bubbles with a credit card as you go. I worked alone and it still took under an hour.
It’s been up for over a year and has not budged, peeled, or warped. Bathrooms get humid, but as long as the wall was clean when you applied it, peel-and-stick holds up fine.
For pattern choice, I’d steer you toward something with a medium-scale repeat. Too tiny and it reads as busy from a distance. Too large and one single repeat overwhelms the narrow wall. Florals with some breathing room, loose geometric patterns, and soft textures like a faux grasscloth all work beautifully. Stay away from anything with a lot of high-contrast dark colors unless your bathroom has really good light.
One thing I’d do differently: I went with a vertical stripe orientation and had to be really careful matching the seams. A non-directional pattern or one with a small repeat is more forgiving if you’re a wallpaper first-timer.
Decorative Ladder for Towels (But Make It Pretty)

This is one of those ideas where the function and the pretty overlap perfectly, which is my favorite kind of bathroom decor.
It’s not a real climbing ladder. It’s a blanket ladder, the kind you find at HomeGoods or World Market for around $30 to $45. The ones I like best are thin natural wood or whitewashed pine, roughly 5 feet tall and only about 14 inches wide at the base. They lean against the wall at a slight angle and take up almost no floor space.
I drape two hand towels over the rungs. Right now it’s sage green and warm cream because that’s the color situation I’m working with in that bathroom. In winter I’ll switch to white and a deep rust. In summer, navy and white. Two new hand towels from TJ Maxx or even Amazon cost $10 to $15 and the whole bathroom looks different. That’s the kind of refresh I can get behind.
The angled lean of the ladder is actually doing a lot of visual work. It breaks up all the perpendicular lines in a bathroom (the toilet, the walls, the door) and adds movement. The warmth of the wood softens a space that can easily feel cold and sterile.
Practical note: the bottoms will slide on tile floors if you let them. I put a pair of small adhesive rubber furniture pads on the feet and it hasn’t moved since. If you’re handy and want to make one yourself, two long dowels and four or five shorter crosspieces, sanded smooth, stained or painted. It’ll cost you about $15 in materials and look completely custom.
Macrame Wall Hanging for Boho Vibes

Bathrooms are full of hard surfaces. Tile, porcelain, glass, chrome. Everything reflects and nothing absorbs. Texture is the fix, and macrame is one of the easiest ways to bring it in.
Mine is a natural cream cotton piece, about 40 inches long and 12 inches wide. It hangs from a small wood dowel rod mounted on the wall above the toilet tank. The fringe at the bottom has some movement, and even just the visual softness of it changes the whole energy of the bathroom.
Size guidance: 10 to 14 inches wide is the sweet spot for this space. Wider and it starts to feel like you’re hanging a rug on the wall. Too narrow and it gets lost. Length-wise, you want the piece to fill the vertical space between the shelf or molding and the top of the tank without actually touching the tank.
A layering trick I tried and loved: I mounted a small floating shelf low on the wall and hung the macrame on the wall behind it so the texture peeked out around the sides. The combination of the shelf’s clean lines against the organic texture of the macrame looked really intentional. It’s a good option if you want function (the shelf) and warmth (the macrame) at the same time.
If you’re at all crafty, beginner macrame is genuinely accessible. Basic knots, a dowel rod, and cotton rope from a craft store. There are simple patterns that take two to three hours for a first-timer and cost about $12 in materials. I’ve made two, and both live in my bathrooms.
The Unexpected Artwork Choice I’m Obsessed With

Every single person who uses my guest bathroom comments on the plates. Every single time.
I have six small decorative plates hung in a loose cluster behind the toilet. They’re all blue and white, but different patterns: one has a floral design, two have geometric borders, one is solid with a scalloped edge, and two are thin-lined delftware-style. I found them over a few months at estate sales and antique markets. Total spend was probably $40, and most individual plates were between $3 and $10.
They hang using plate hangers, those coiled wire things that grip the back rim. You can find them at craft stores or on Amazon for cheap. The cluster arrangement is loose and organic, not a perfect grid. Some plates overlap slightly in the arrangement (visually, not physically). It looks collected and personal, not like a Pinterest template.
A few variations that would work just as well:
- All white plates in different sizes and textures. Very elegant, very simple.
- Same pattern in different sizes, smallest at top, largest at bottom.
- A color family, like all green-and-white or all terracotta tones.
Practical must: keep the plates lightweight. Heavy stoneware and ceramics are a genuine safety concern on a bathroom wall. Lighter decorative porcelain, melamine, or even acrylic plates that look ceramic are much better choices here. Use proper wall anchors. And hang everything high enough that no one bumps their head walking past.
Open Shelving with Rolled Towels (Hotel Spa Energy)

I became a person who rolls their towels and I have zero regrets about it.
I mounted three narrow shelves stained in warm walnut on the wall behind my toilet. Each shelf is about 20 inches wide and 4 inches deep. On them: rolled white towels, all facing the same direction, all rolled to roughly the same diameter. A small glass jar with cotton balls on one shelf. A single soy candle on another. That’s it.
The uniformity is everything. If the towels were different colors or folded in different ways or mixed with a bunch of other stuff, this would look chaotic. The repetition of the white rolls creates a calm, orderly feeling that’s exactly what you want in a bathroom. It’s the kind of thing that makes guests say “this feels like a hotel” and genuinely mean it as a compliment.
How to roll towels so they actually stay rolled and look neat: lay the towel flat, fold it in thirds lengthwise so you have a long narrow rectangle, then roll tightly from one end. The tighter the roll, the more they hold their shape on the shelf. I re-roll mine about once a week, and it takes maybe two minutes total.
This setup has a bonus I didn’t anticipate: guests actually feel comfortable grabbing a fresh towel when they need one. Everything is visible and clearly available. No digging through a cabinet, no awkward “where are the towels” moment. It’s a small thing but it makes having people over so much easier.
My Personal Favorite: The Mix-and-Match Approach

Here’s what my wall actually looks like right now, after probably five different iterations in the past year.
One floating shelf with a small trailing pothos and a candle. Two small framed prints hung above the shelf, slightly asymmetric. A woven basket on the floor behind the tank holding extra toilet paper. That’s the whole thing. Functional, layered, warm, and put-together without looking like I tried too hard.
The lesson from all that experimenting: you don’t have to commit to one idea. The space is small enough that mixing things actually works better than a single concept executed in isolation. A shelf plus art is more interesting than just a shelf. A plant plus a basket reads as intentional. Texture from a woven basket plus the softness of a plant plus the crispness of frames creates dimension that any single element alone can’t.
What I’d suggest if you’re starting from zero: pick one idea from this list that excites you the most and start there. Get that one thing on the wall. Live with it for a week. Then add one more layer. You’ll quickly develop a sense for what feels right in your specific bathroom, with your light and your colors and your proportions.
I’ve changed that wall behind my toilet more times than I can count, and every version taught me something. Too much stuff looks cluttered. Too little looks unfinished. The goal is that sweet middle zone where the space feels like you actually thought about it, even if you spent $30 and one Saturday afternoon getting there.
And honestly? That’s the whole point. Not a perfect room. Just a room that feels good to be in, even for two minutes while you’re brushing your teeth.